How to connect optic fibre modem and DECO router (router supplied by Oricom).
- A technician will bring the modem below and will complete the activation of the optic fibre at your home. This installation can take from 2 to 4 hours.
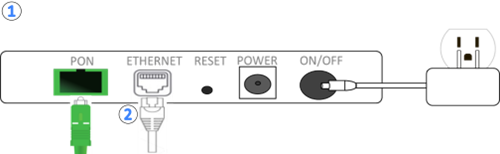
- Connect a network cable into the Ethernet port at the back of the modem. Connect the other end in the "port 1" of the main routeur.
*If you have more than one routeur, the main one has a label underneath with the network name and password.
- If you want to connect your computer, television or other devices directly into the router, connect each of your devices into one of the available port at the back of your router.

- Connect the power adapter of your primary router.
- Wait until the light at the bottom of your routeur is green. It will first light up yellow, then blue. It will then light up in a steady green. This operation can take up to 5 minutes.
If you have multiple routeurs, place them at the desired location you want and connect the power adapter into a power outlet.

You are now ready to connect your devices to your Wi-Fi network.
- On the device you wish to connect, choose the network name that matches the one shown on the label under the DECO router.
- Then enter the password shown on the same label.
Adding more TP-Link DECO pods.
Adding TP-Link DECO pods allows you to achieve optimum coverage on other floors or in other parts of your home.
If your additional DECO unit comes from Oricom, it will be already configured. Follow the instructions below:
- Place the new pod where you want it and plug it into a power outlet, ensuring it is within range of your existing pod.
- If the light on the new pod is yellow, move it closer to the main pod until the light turns green.
If your DECO unit is not from Oricom, you'll first need to configure it in the TP-Link DECO application, then follow steps 1 and 2 to connect it.
Setting Up and Using the TP-Link Deco App
This application is useful for:
- Update your home network name and password;
- Manage your guest network;
- Advanced router management, such as opening external ports when required by certain devices.
In addition, if you have more than one DECO unit, you can use the application to confirm that they are all online, and to see which guests are connected.
To set up and use the TP-Link Deco app:
- Download the app from Apple App Store or Google Play;
- On your smartphone, connected to your Wi-Fi network;
- Create a TP-Link login ID and sign in.
The app will automatically link to your pod, allowing you to manage your home network directly from your smartphone or your tablet!
How to connect optic fibre modem, router and telephony gateway
How to connect a cable modem and a router
- Connect a network cable into the Ethernet port at the back of the modem.
- Connect the coaxial cable from the modem to the wall socket.
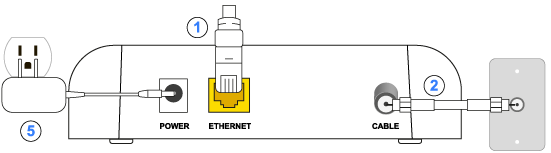
- Take the network cable connected to the modem and plug it into the router's WAN or Internet port (blue port).
- If you want to connect a computer, television, or other devices directly to the router, connect each of your devices to a LAN port on the router using network cables.
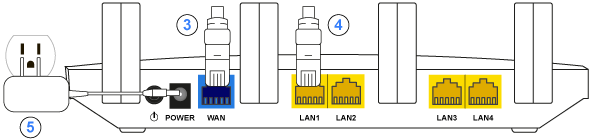
- Connect the modem and router power adapter.
- Wait until the Online or Cable light on the modem is steady.

How to connect a cable modem, router, and telephony gateway
- Connect a network cable into the Ethernet port at the back of the modem.
- Connect the coaxial cable from the modem to the wall socket.
- Take the network cable connected to the modem and plug it into the router's WAN or Internet port (blue port).
-
Connect a network cable to the back of the router in the LAN1 port (yellow port).

- Connect your telephone cable into the Phone1 port on the gateway.
- Take the network cable plugged into the LAN1 port of the router and plug it into the Internet port of the gateway (blue port).
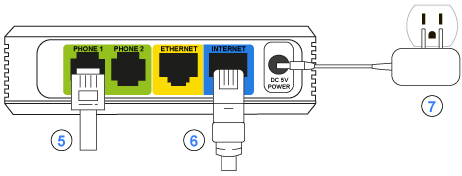
- Connect power adapter for each device; modem, router and telephony gateway.
- Wait until the Online or Cable light on the modem is steady.

ATTENTION! Your telephone service will be operational only once you have confirmed your 911 address and enabled the gateway in your Customer Area. Once the equipment is connected, please follow the activation instructions (yellow sheet that comes with your gateway) or go to https://zoneclient.oricom.ca/Telephony and click on « 911 address(es) ».
Note : If the router has not been configured by Oricom, open port 8050 on the TCP protocol.
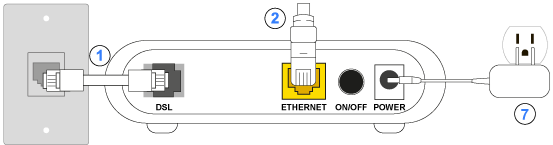
How to connect a DSL modem and router
- Plug the telephone cable into the DSL port of the modem and connect it to the wall socket.
- Plug a network cable into the Ethernet or Wan port on the back of the modem.

- Take the network cable connected to the modem and plug it into the WAN or Internet port of the router (blue port).
- If you want to connect a computer, TV, or other devices directly to the router, connect each of your devices to a LAN port on the router using network cables.
- Connect the power adapter to the modem and router.
- Wait until the Online or DSL light on the modem is steady.

Note : If the router has not been previously configured by Oricom, you must configure the PPPoE connection to access the Internet.
How to connect a DSL modem, router and telephony gateway
- Plug the telephone cable into the DSL port of the modem and connect it to the wall socket.
- Plug a network cable into the Ethernet or Wan port on the back of the modem.
- Take the network cable connected to the modem and plug it into the WAN or Internet port of the router (blue port).
- Plug a network cable from the back of the router into the LAN1 port (yellow port).
- Connect the wire from your phone to the Phone1 port on the gateway.
- Take the network cable connected to the LAN1 port of the router and plug it into the Internet port of the gateway (blue port).
- Plug in the power adapter for each device; modem, router and telephony gateway.
- Wait until the Online or DSL light on the modem is steady.

ATTENTION! Your telephone service will be operational only once you have confirmed your 911 address and enabled the gateway in your Customer Area. Once the equipment is connected, please follow the activation instructions (yellow sheet that comes with your gateway) or go to https://zoneclient.oricom.ca/Telephony and click on « 911 address(es) ».
Note: If the router has not been configured by Oricom, you must configure the PPPoE connection in the router to access the Internet
Configuring a DSL connection on various operating systems.
Configuring a Cable Connection on Mac
- Click on the « Apple » at the upper left and select « System Preferences ».
- Then click « Network ».
- Make sure that the « Built-in Ethernet » box is checked in the menu on the left.
- Make sure that « Via DHCP » is shown in the « Configure » option.
- If the network cable is properly connected, an IP address will be assigned (shown in this image), indicating that the Internet access is up and running.
Configuring a PPPoE Connection on Mac
- Click on the « Apple » at the upper left and select « System Preferences ».
- Then click « Network ».
- Make sure that the « Ethernet » box is checked in the menu on the left.
- Click « Configure » and select « Connect using PPPoE ».
- For the service name, enter « PPPoE » or « Oricom ».
- The « PPPoE Server » field can be left blank. Otherwise, write « Oricom ».
- The account name is the ORICOM INTERNET email address with the « @oricom.ca » (Example: connection@oricom.ca).
- The password is the one provided. If you select « Remember this password » you will not have to enter it every time.
- Click on « Apply » at the bottom of the page and click on the connection on the left. Finally, click « Connect ».
Configuring a PPPoE Connection on Windows 7
- Click on « Start », then « Control Panel ».
- Go to the Control Panel, On the upper left side next to « View by » select « Category ». Then click on « Network and Internet ».
- In the new window, click on « Network and Sharing Centre ».
- Click on « Set up a new connection or network ».
- Once in the « Set up a New Connection or Network » wizard, click on « Connect to the Internet », then « Next ».
- Click on « Broadband (PPPoE) ».
- Enter your user name, being sure to include « @oricom.ca ». Enter your password. Check « Remember this password » so that you do not need to enter it every time.
- Click « Connect » to finish and launch the connection.
This section includes all of the information that you need to efficiently configure your Internet phone (VoIP) router or gateway.
Configuring your Wi-Fi network
How to configure my Wi-Fi network in my router
Here are the steps to configure your wireless network in your router.
- Connect the computer to the Wi-Fi network or to one of the router's "LAN" ports.
- Open your web browser.
- Go to your router's configuration page. The default address for most routers is: 192.168.0.1
- Choose the option for the "wireless" configuration in the menu.
- Enter the name you want to give to your network in the “wireless network name” (or “SSID”) box).
- Choose "WPA2" as the security type.
- Enter the password of your choice in the box provided. It is recommended to put numbers, capital letters and special characters for more security.
- Click "Save".
Note: It is recommended to change the administrator password of the router for more security.
Manage your Wi-Fi network name and password with the TP-Link Deco app
Manage a guest network using the TP-Link Deco app
How to connect a device to the wireless network
To connect a device to the Wi-Fi network, you will need to ensure that Wi-Fi of the device is turned on, then check if there is Wi-Fi networks.
Find the name of the wireless network that is indicated on the label on the router provided by Oricom Internet. The configuration and connection information is shown on this label, here is a picture.
Note: Always use the 5 GHz network if your device is compatible.
iOS (iPhone, iPad, etc.)
- Go to « Settings », and then « Wi-Fi ».
- Slide the wireless switch to on position (green). Your device will automatically search for available Wi-Fi networks.
- Select the name of your wireless network to connect your device.
MAC
- Click the « Wi-Fi menu » icon and select « Activate Wi-Fi ».
- Select the « Wi-Fi menu » icon and then your wireless network name.
Android
- Open the « Settings » menu and tap « Connections », then « Wi-Fi ».
- Slide the wireless switch to on position (green). Your device will automatically search for available Wi-Fi networks.
- Select the name of your wireless network to connect your device.
Windows
- Make sure that Wi-Fi is enabled.
- Select the Wi-Fi icon in the notification area at the bottom right.
- Select your wireless network name and click « Connect ».
Configuring your router
Configure a router for a cable connection
Here are the steps to configure your router for a cable connection:
- Connect your computer to the Wi-Fi network or on one of the « LAN » ports on your router.
- Open your web browser.
- Go to the configuration page of your router. The default address for most routers is: « http://192.168.0.1 ».
- In the menu, choose the « Internet » (or « WAN ») option for the configuration.
- Choose « Dynamic IP » as type of connection.
- Press the button to save the changes.
Configure a router for a DSL connection
Here are the steps to configure your router for a cable connection:
- Connect your computer to the Wi-Fi network or on one of the « LAN » ports on your router.
- Open your web browser.
- Go to the configuration page of your router. The default address for most routers is: « http://192.168.0.1 ».
- In the menu, choose the « Internet » (or « WAN ») option for the configuration.
- Choose « PPPoE » as type of connection.
- Enter the username and password for the PPPoE connection in the boxes provided for this purpose.
- Press the button to save the changes.