- Connect a network cable into the Ethernet port at the back of the modem.
- Connect the coaxial cable from the modem to the wall socket.
- Take the network cable connected to the modem and plug it into the router's WAN or Internet port (blue port).
-
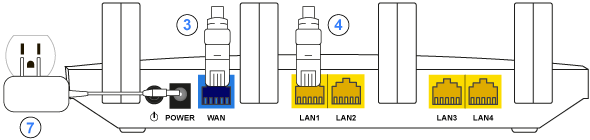
Connect a network cable to the back of the router in the LAN1 port (yellow port).
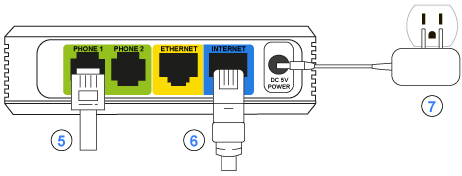
- Connect your telephone cable into the Phone1 port on the gateway.
- Take the network cable plugged into the LAN1 port of the router and plug it into the Internet port of the gateway (blue port).
- Connect power adapter for each device; modem, router and telephony gateway.
- Wait until the Online or Cable light on the modem is steady.

ATTENTION! Your telephone service will be operational only once you have confirmed your 911 address and enabled the gateway in your Customer Area. Once the equipment is connected, please follow the activation instructions (yellow sheet that comes with your gateway) or go to https://zoneclient.oricom.ca/Telephony and click on « 911 address(es) ».
Note : If the router has not been configured by Oricom, open port 8050 on the TCP protocol.
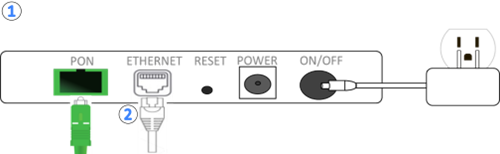
- Plug the telephone cable into the DSL port of the modem and connect it to the wall socket.
- Plug a network cable into the Ethernet or Wan port on the back of the modem.
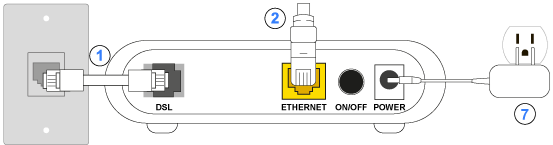
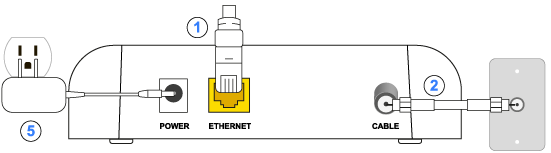
- Take the network cable connected to the modem and plug it into the WAN or Internet port of the router (blue port).
- Plug a network cable from the back of the router into the LAN1 port (yellow port).
- Connect the wire from your phone to the Phone1 port on the gateway.
- Take the network cable connected to the LAN1 port of the router and plug it into the Internet port of the gateway (blue port).
- Plug in the power adapter for each device; modem, router and telephony gateway.
- Wait until the Online or DSL light on the modem is steady.

ATTENTION! Your telephone service will be operational only once you have confirmed your 911 address and enabled the gateway in your Customer Area. Once the equipment is connected, please follow the activation instructions (yellow sheet that comes with your gateway) or go to https://zoneclient.oricom.ca/Telephony and click on « 911 address(es) ».
Note: If the router has not been configured by Oricom, you must configure the PPPoE connection in the router to access the Internet
- Take the DSL modem out of the box and make sure that you have: the DSL modem, the power adapter, the network cable (RJ-45) and the telephone cord.
- Take the IP gateway out of the box and make sure you have: the IP gateway, the power adapter and the network cable (RJ-45).
- Plug one end of the network cable (RJ-45) into the « Ethernet » port in the back of the modem .Plug the other end into the blue Internet port on the IP gateway.
- Plug one end of the network cable (RJ-45) into the back of the IP gateway, into the « Ethernet (yellow) » port and the other into the computer’s network adapter card.
- Plug one end of the telephone cord into the DSL modem and the other into the wall jack.
- Plug the power adapter into the DSL modem. When the first 3 lights (« Power », « Ethernet » et « DSL »), are on and stop flashing, plug the power adapter into the IP gateway.
- Activate your 911 address.
Note on telephone filters:
Every telephone device (telephones and faxes) must have its own filter:
Very important : The DSL modem should NEVER, be connected to a filter.